
How to Optimize IHC Antibody Dilution: A Practical Guide
Immunohistochemistry (IHC) uses antibodies to detect specific proteins in tissue sections. But getting clear, reliable staining is not always straightforward. An unsuitable antibody concentration can lead to weak signals, high background, or inconsistent results.
Finding the right dilution takes more than following the manufacturer's recommendation. Tissue type, fixation, antigen retrieval, detection method, and target abundance can all affect staining. A systematic antibody titration helps identify a concentration that delivers clear, specific signals with minimal background.
This guide walks you through selecting a starting dilution, testing antibody concentrations, evaluating staining quality, and troubleshooting common problems.
What Is the Optimal IHC Antibody Dilution?
There is no universal dilution for IHC. The right concentration depends on the antibody, target abundance, tissue preparation, and detection system.
Start by checking the manufacturer's recommendations for IHC, including validated sample types, compatible species, working concentrations, and antigen retrieval conditions.
Sample preparation matters, too. Formalin-fixed, paraffin-embedded (FFPE) tissues may require heat-induced or enzymatic antigen retrieval to expose masked epitopes, while frozen tissues can behave differently due to differences in fixation and antigen preservation.
The detection method also affects the optimal dilution. For example, HRP/DAB-based and fluorescence-based systems may differ in sensitivity and background, so a dilution suitable for one setup may not work equally well for another.
Treat the manufacturer's recommended dilution as a starting point, not a universal standard. The final working concentration should be established under the conditions used in the intended experiment.
How to Optimize IHC Antibody Dilution Step by Step
A structured titration experiment makes it easier to identify a suitable working concentration and understand how antibody dilution affects staining quality.
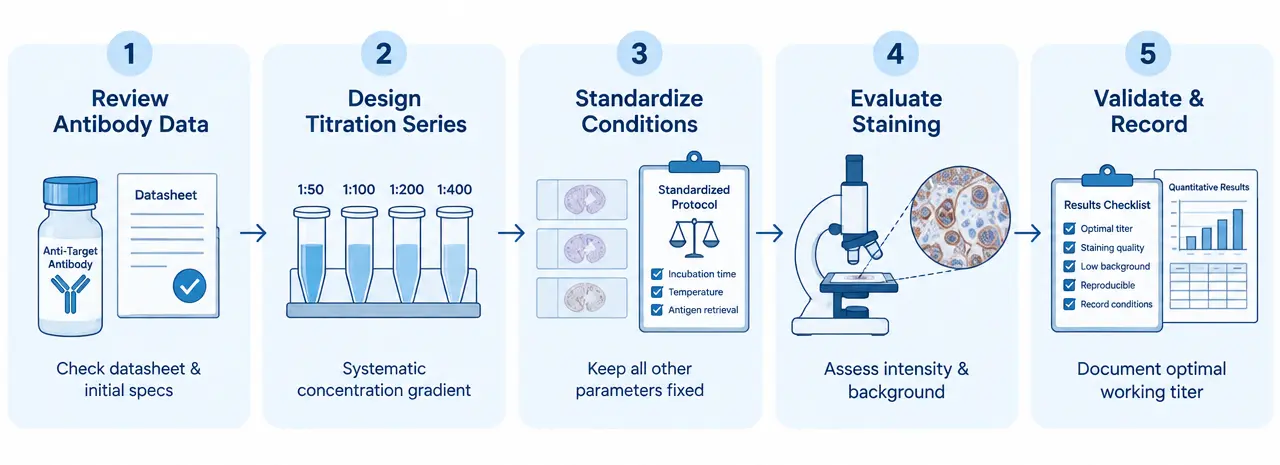
Step 1: Review Antibody Validation Data
Confirm that the antibody has been validated for IHC and is appropriate for the target species and sample type. Check the recommended dilution range, antibody formulation, storage conditions, and any requirements for antigen retrieval or detection.
If the antibody has only been validated for Western blotting or immunocytochemistry, do not assume that the same concentration will work in tissue sections.
Whenever possible, use a known positive tissue or sample in which the target is expected to be expressed. Include appropriate negative controls to help assess nonspecific staining.
Step 2: Design an Antibody Titration Series
Start with the manufacturer's recommended dilution and select a series of concentrations around that starting point.
For example, if the recommended dilution is 1:200, a preliminary titration series could include:
| Antibody dilution | Relative antibody concentration | Purpose |
|---|---|---|
| 1:100 | Higher | Assess whether increased antibody concentration improves signal |
| 1:200 | Reference | Evaluate the manufacturer's recommended starting condition |
| 1:400 | Lower | Assess whether background decreases while specific staining is retained |
| 1:800 | Lowest in this example | Determine whether the signal remains detectable at a more dilute concentration |
These ratios are illustrative starting conditions, not universal recommendations. The appropriate range depends on the antibody and assay. If all conditions produce weak staining or excessive background, extend the range or investigate other experimental variables.
Prepare each dilution carefully using a compatible antibody diluent. For example, to prepare 1 mL of a 1:200 working solution, mix 5 µL of antibody stock with 995 µL of diluent, assuming the ratio refers to one part stock in 200 parts final volume.
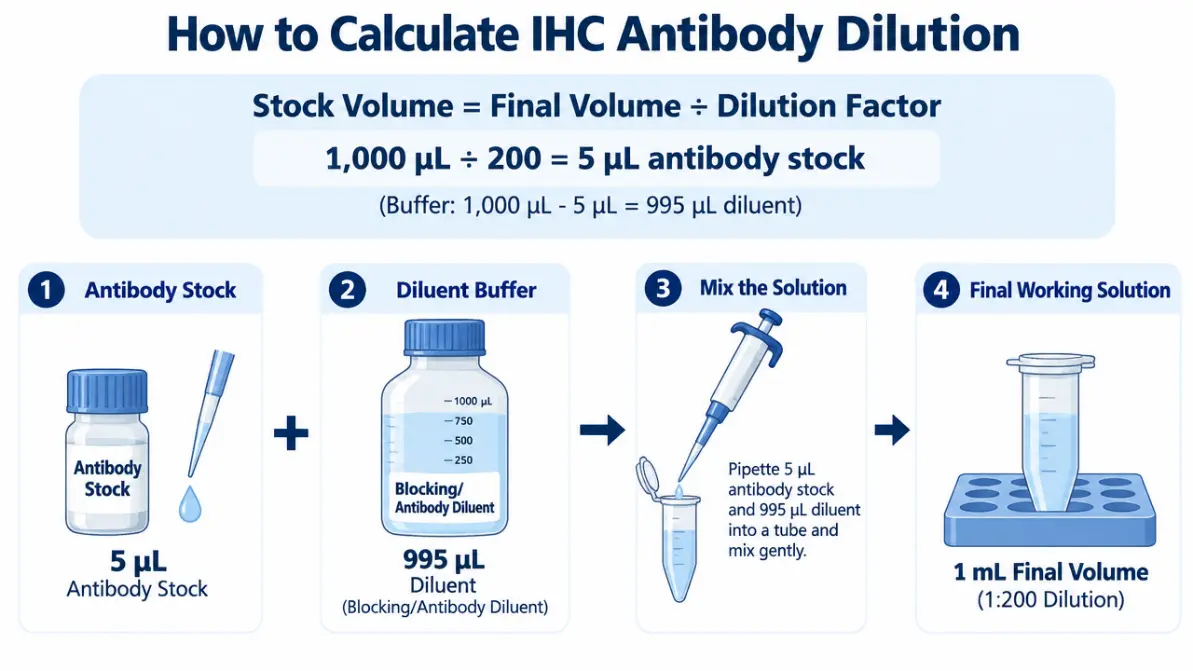
Prepare enough solution for the required number of sections, allowing for pipetting losses. Use appropriate pipetting techniques, particularly when handling small volumes.
Step 3: Keep Other Experimental Conditions Consistent
To determine whether antibody concentration is responsible for differences in staining, change the antibody dilution while keeping other conditions as consistent as possible.
Use comparable tissue sections, preferably adjacent sections from the same specimen. Maintain the same antigen retrieval procedure, blocking conditions, incubation time, temperature, secondary antibody conditions, washing steps, and detection method.
If multiple variables change simultaneously, it becomes difficult to determine which adjustment caused the observed result.
For a more reliable comparison, include the same positive and negative controls across the titration series. A no-primary-antibody control can help identify background associated with the secondary antibody or detection system, although it does not assess every source of nonspecific staining.
Step 4: Evaluate Staining Quality and Select the Working Dilution
After staining, compare the sections using consistent imaging and evaluation conditions.
Assess four main criteria:
- Signal intensity: Is the target sufficiently detectable?
- Background staining: Is nonspecific staining acceptably low?
- Localization: Does the staining pattern match the expected cellular or tissue distribution of the target?
- Reproducibility: Can the result be obtained consistently across comparable sections or repeat experiments?
The darkest section is not necessarily the best result. A highly concentrated antibody may produce strong staining in the target region while also increasing nonspecific background.
The preferred dilution is the one that provides interpretable, target-specific staining with acceptable background and reproducibility. Confirm the selected condition with appropriate controls and, when necessary, additional tissue samples.
How to Interpret IHC Staining Results
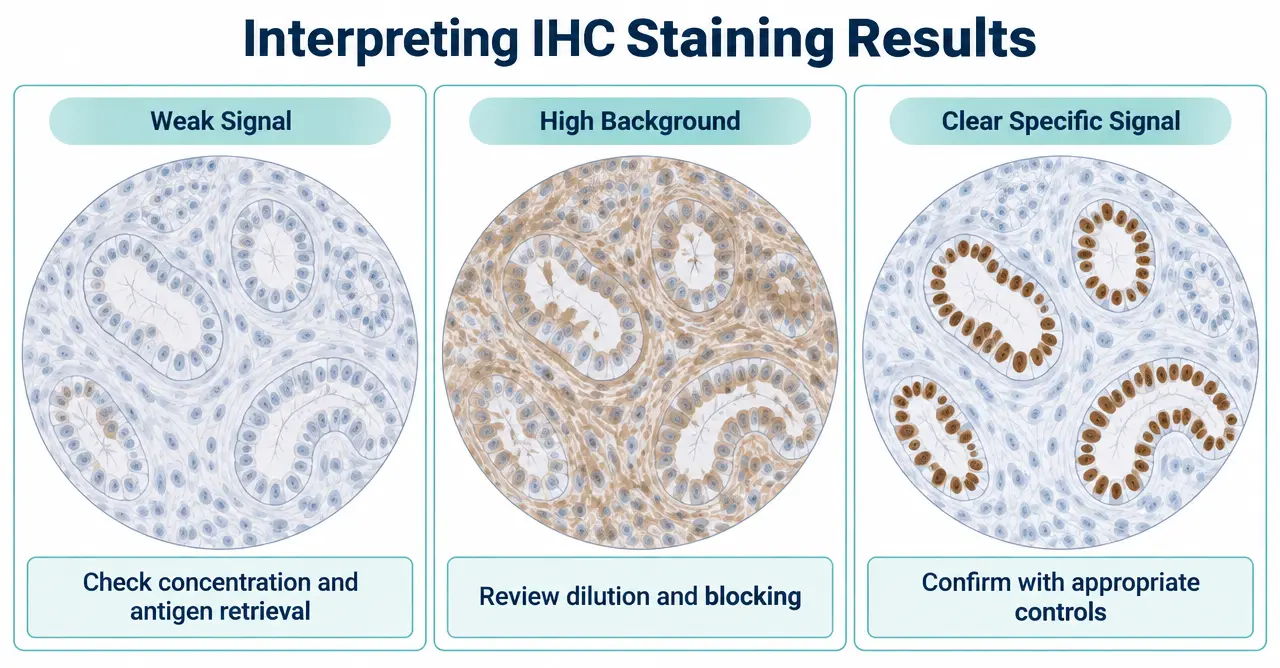
Staining patterns can help guide troubleshooting, but they should be interpreted alongside controls and sample preparation information.
| Observed result | Possible causes | Recommended next steps |
|---|---|---|
| Weak or absent staining | Antibody concentration too low, low target abundance, inadequate antigen retrieval, inactive antibody, or detection failure | Test a higher antibody concentration and verify the positive control, retrieval conditions, and detection system |
| Strong background staining | Excessive antibody concentration, nonspecific binding, insufficient blocking or washing, or endogenous enzyme activity | Test a more dilute antibody and review blocking, washing, and detection conditions |
| Strong signal with unclear localization | Nonspecific binding, cross-reactivity, or unsuitable sample preparation | Review antibody specificity and compare results with appropriate controls |
| No clear staining across all dilutions | Antibody incompatibility, sample-related issues, or failure elsewhere in the staining workflow | Check the positive control, antibody handling, antigen retrieval, and detection reagents |
| Inconsistent staining between sections | Differences in fixation, tissue composition, section preparation, or experimental handling | Standardize sample processing and repeat the experiment under controlled conditions |
These patterns are troubleshooting clues rather than definitive diagnoses. For example, weak staining does not always mean that more antibody is needed. Increasing the concentration will not necessarily solve an inaccessible epitope or a failed detection step.
Likewise, reducing antibody concentration may decrease background but can also weaken a genuine target signal. Evaluate both signal specificity and intensity before selecting a new working condition.
Common Mistakes to Avoid During IHC Antibody Optimization
Several avoidable mistakes can make antibody titration less informative.
Using the same dilution for every antibody. Antibodies differ in affinity, specificity, formulation, and application performance. A dilution validated for one antibody should not automatically be transferred to another.
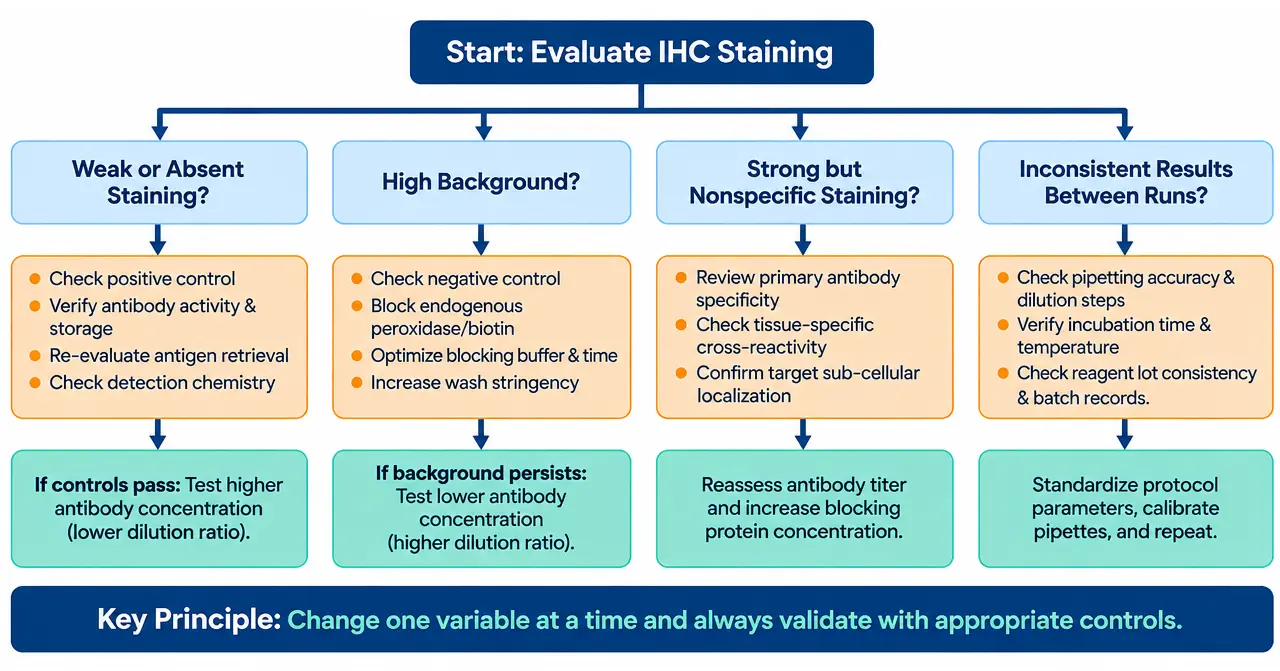
Changing multiple variables at once. Simultaneously adjusting antibody concentration, antigen retrieval, and incubation time makes it difficult to interpret the results. Optimize one variable at a time when practical.
Selecting conditions based only on staining intensity. Strong staining can reflect nonspecific binding rather than better target detection. Consider tissue localization, background, and controls together.
Ignoring sample preparation. Fixation duration, tissue processing, and antigen retrieval can substantially affect antigen accessibility. These factors should be investigated if dilution changes alone do not improve the result.
Overlooking antibody handling. Follow the manufacturer's storage and handling recommendations. Avoid unnecessary freeze-thaw cycles when applicable, and use a compatible diluent.
Failing to document the final conditions. Record the antibody identity, lot number, dilution, sample type, antigen retrieval method, incubation conditions, detection reagents, and evaluation results. These records make future experiments easier to reproduce.
Conclusion
Optimizing IHC antibody dilution is a systematic process of testing concentrations, controlling experimental variables, and evaluating staining quality. Starting with validated antibody information, using a suitable titration series, and interpreting results alongside appropriate controls can help researchers identify working conditions for their specific samples.
If IHC staining remains difficult to interpret after dilution optimization, review the complete staining workflow rather than focusing on antibody concentration alone. Sample preparation, antigen retrieval, blocking, and detection chemistry may all contribute to the final result.
Need support with your IHC study? Contact our team to discuss your experimental requirements and explore relevant immunohistochemistry research support, where available.
Creative Bioarray Relevant Recommendations
| Products & Services | Description |
|---|---|
| Immunohistochemistry (IHC), Immunofluorescence (IF) Service | Creative Bioarray offers a comprehensive IHC service from project design, marker selection to image completion and data analysis. |
| Histology Services | Creative Bioarray offers tissue processing, embedding, sectioning, and staining, along with set of histological examination services. |