Organ-on-a-Chip: Is Your Microfluidic Setup Ready for Preclinical Trials?
In the world of drug development, we've reached a tipping point. Traditional 2D cell cultures are too simple, and animal models-while complex-often fail to predict how a human body will actually react to a new drug. This is where Organ-on-a-Chip (OoC) technology steps in.
However, moving from a standard Petri dish to a microfluidic system isn't just "shrinking" your experiment. It's a complete shift in how you design, execute, and validate your data. As a preclinical CRO, we see the same hurdles repeatedly. This guide breaks down the best practices for organ chip setup, microfluidics experiment design, and, most importantly, achieving chip reproducibility.
1. Defining the "Why" Before the "How"
Before you touch a single pipette, you must define your Context of Use (CoU). Are you trying to see if a drug is toxic to the liver, or are you trying to see how a drug crosses the blood-brain barrier?
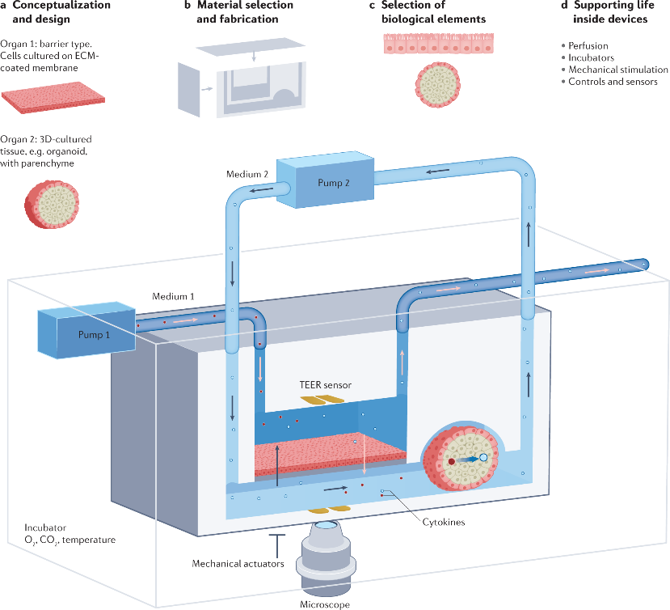
- Physiological Mapping: You need to mimic the "physics" of the organ. For example, blood doesn't just sit on your cells; it flows, creating "shear stress." In a microfluidic chip, we calculate this to ensure the cells "feel" like they are in a human body.
- Choosing Your Cells: A chip is only as good as the life inside it. While cell lines (like HepG2 for the liver) are easy to use, they don't behave like human tissue. We recommend primary human cells or iPSCs (induced pluripotent stem cells) to ensure the results actually translate to clinical success.
2. Strategic Organ Chip Setup: Hardware and "Real World" Physics
The physical organ chip setup is where most experiments live or die. It's not just about the chip itself; it's about the entire "plumbing" system.
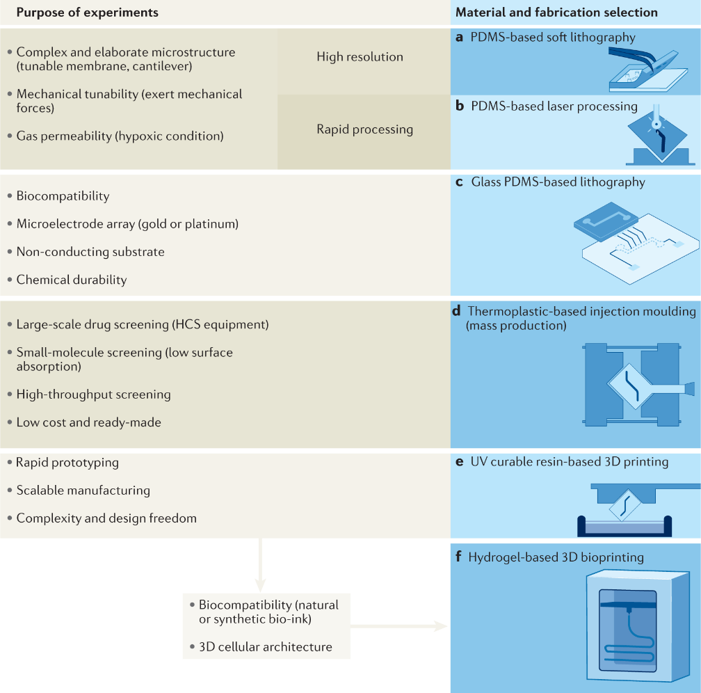
Material Choice: The PDMS Trap
Most academic labs love PDMS (a flexible, clear silicone) because it's easy to mold. However, in a professional drug-testing environment, PDMS has a major flaw: it "soaks up" small molecules. If you are testing a drug and the chip absorbs half of it, your data is useless.
- CRO best practice: For drug screening, consider thermoplastics (like COC or COP). They are inert, meaning they won't interfere with your drug concentration.
The "World-to-Chip" Interface
Connecting your pump to your chip is a critical failure point.
- Minimize dead volume: Use the shortest tubing possible. Long tubes mean more surface area for drugs to stick to and more "lag time" for your flow to reach the cells.
- Kill the bubbles: In microfluidics, a single air bubble acts like a wrecking ball. It can strip cells right off the surface. Always use bubble traps and ensure your media is "degassed" (pre-warmed) before it enters the system.
3. Microfluidics Experiment Design: Setting the Flow
A successful microfluidics experiment design focuses on balance. You want enough flow to provide nutrients and remove waste, but not so much that you wash the cells away.
Flow Dynamics
- Recirculating flow: Mimics how the blood circulates through the body, allowing metabolites (breakdown products of drugs) to build up. This is essential for studying drug metabolism.
- Single-Pass flow: Best for studying how a drug is cleared or for long-term "steady state" experiments.
Dosing Logic
In a 24-well plate, you just dump the drug in. In a chip, you have to think about residence time-how long the drug actually stays in contact with the cells. We use a simple rule: match the flow rate to the organ's natural blood flow velocity as closely as possible.
4. The Holy Grail: Chip Reproducibility
The biggest criticism of Organ-on-a-Chip tech is that "it's too finicky." To get your data accepted by regulators (like the FDA), you need chip reproducibility. You need to prove that Chip #1 and Chip #100 behave exactly the same.
Standardizing the Surface
Cells don't like to grow on bare plastic or glass. They need an "extracellular matrix" (ECM) like collagen.
- The CRO standard: We don't just "coat" the chip; we validate the coating. We use standardized protocols to ensure the protein layer is the same thickness every time. If the coating is uneven, the cells will cluster, and your results will vary.
Managing the "Edge Effect"
Because the volumes in microfluidics are so tiny (often just a few microliters), evaporation is your enemy. If 10% of your liquid evaporates, the salt concentration in your media increases, stressing the cells.
- Solution: Use secondary humidification. We place our chips in specialized chambers that keep the local humidity near 100%, ensuring the "chemical recipe" inside the chip stays constant.
5. Monitoring: Checking the "Pulse" of Your Chip
How do you know the cells are healthy without tearing the chip apart?
- TEER (barrier integrity): This measures electrical resistance across a cell layer. If the resistance is high, the "wall" (like the gut lining) is tight and healthy. If it drops, you have a leak. It's the best way to get real-time data without stopping the experiment.
- Sampling the outflow: Think of the fluid leaving the chip as a "blood sample." We analyze this effluent for biomarkers (like albumin for liver health or LDH for cell death). This allows us to create a "time-lapse" of how the organ is responding to a drug.
The CRO Checklist for Success
Before we start a formal study for a client, we run through this "pre-flight" checklist:
- Leak test: Run the system with PBS (buffer) for 24 hours at high pressure. If it leaks now, it will definitely leak with expensive cells inside.
- Sterility validation: Ensure the entire closed-loop system is sterile. Contamination in a microfluidic system is almost impossible to "clean out" once it starts.
- Baseline stabilization: Let the cells acclimate to the flow for at least 48-72 hours before adding any drugs. Cells need time to "wake up" and adapt to their new home.
Summary: Why Quality Matters
Organ-on-a-Chip technology is a powerful tool, but it is not a "plug-and-play" solution. It requires a disciplined approach to organ chip setup and a deep understanding of microfluidics experiment design.
By focusing on chip reproducibility, you move from "cool science" to "validated data" that can actually speed up drug discovery and reduce the reliance on animal testing.
Are you ready to elevate your preclinical assays? Success isn't found in the complexity of the chip, but in the consistency of the process. Whether you are building your own lab or partnering with a CRO, prioritize the physics, respect the biology, and always, always watch out for the bubbles.
Need expert help with your next MPS study?
As a specialized preclinical CRO, we provide the technical infrastructure and biological expertise to turn your microfluidic concepts into reproducible, regulatory-ready data. Contact our technical team to discuss your project requirements.
Creative Bioarray Relevant Recommendations
| Products & Services | Description |
|---|---|
| Organ-on-a-Chip Platform for Drug Development | Creative Bioarray focuses on developing specific human disease models and leveraging our organ-on-a-chip platform to identify new therapeutics and clinical biomarkers, promote drug development, and create novel drug delivery systems. |
Reference
- Leung, C.M., de Haan, P., K. et al. A guide to the organ-on-a-chip. *Nat Rev Methods Primers.*2022. 2, 33.