Corneal Angiogenesis Assay
Angiogenesis is a highly complex process by which new blood vessels form from preexisting ones, involving the interaction of multiple cell types and is triggered by a change in balance between pro- and anti-angiogenic factors, which normally maintains the vasculature in a quiescent state. Continuous monitoring of angiogenesis in vivo is required for the development and evaluation of drugs acting as suppressors or stimulators of angiogenesis. The corneal angiogenesis assay is carried out by placing an angiogenesis inducer into a microcapsule molded in the cornea stroma to induce blood vessel growth from the peripheral vasculature, which is a quantitative, reproducible, flexible assessment of angiogenesis in vivo. The major advantage of this assay is that the measurement of background vessels is unnecessary because the vessels grow on a physiologically avascular tissue.
Application
- Characterization of angiogenesis inducers
- Evaluation of angiogenesis inhibitors
- Interaction between different factors
- Study of the cellular, biochemical, and molecular mechanisms of angiogenesis
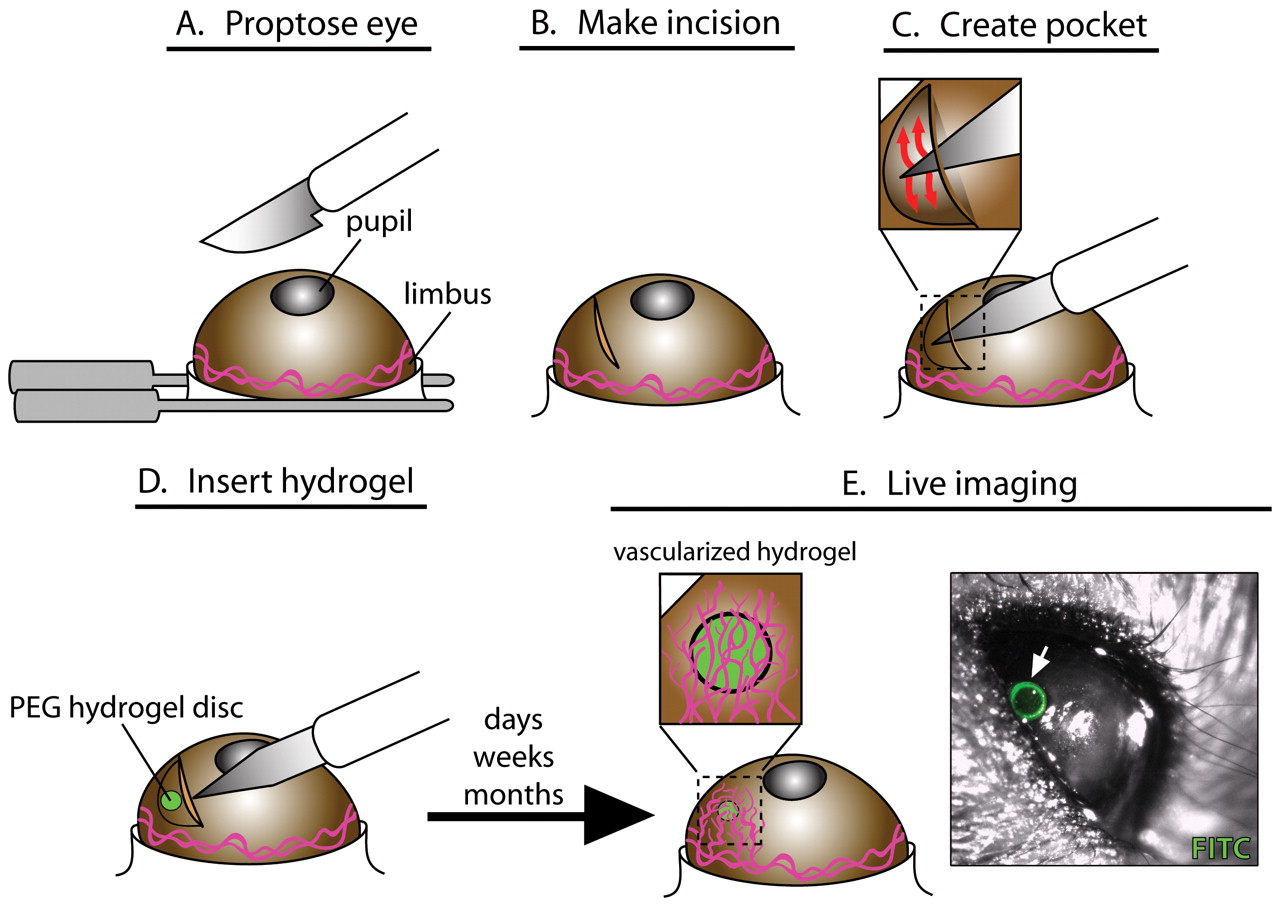 Figure 1. Schematic Illustration of the corneal angiogenesis assay.
Materials and Equipment
| Materials | Equipment |
| C57BL/6J mice (8-week) | Slit lamp microscope |
| Antibiotic eye ointment | Vacuum evaporator set |
| Hydron | Sterile mesh (300 mm nitex nylon) |
| Ethanol | Sterile spatulas (unbent or bent) and forceps |
| Avertin | Surgical binocular operating microscope |
| Sucralfate | Von Graef knife (1.5 mm x 27 mm) |
| VEGF or bFGF | Jeweler’s forceps |
| Proparacaine hydrochloride ophthalmic solution | 30° micro-knife |
Pellets Preparation
- Weigh out 10 mg of sucralfate and 60 mg of hydron into separate microcentrifuge tubes.
- Add 500 μL of ethanol to the hydron and vortex for 20 min.
- Add the growth factor (standard: 20 μg bFGF for 80 ng pellets, 50 μg VEGF for 160 ng pellets) to the sucralfate and vortex briefly.
Note: Liquid volumes added should be a minimum of 20 μL to ensure the sucralfate is completely moistened but should not exceed 50 μL. - Place the sucralfate mixture into the vacuum evaporator set until the mixture is completely dry, normally 30-50 min depending on the volume of liquid used.
- Use the unbent spatula to break up the dried mixture to check for residual moisture.
- Add 10 μL of the hydron to the sucralfate.
- Quickly use bent spatula to mix the hydron and sucralfate.
- Spread the mixture onto the prepared mesh using forceps to hold it in place. The mixture should be an even layer and fill into the holes of the mesh.
- Immerse the bent spatula into the hydron and use it coat both sides of the mesh.
- Drying at room temperature (RT) for 30 min.
- Use the pair of forceps to carefully pull the fibers of the mesh apart over the sterile petri dish. Check pellets for uniformity under a microscope.
Note: Store pellets in -20°C freezer for up to 3 months.
Pellets Implantation
- Anesthetize the mouse with avertin (400-500 mg/kg) and position the mouse under microscope so eye is visible.
- Anesthetize the eyes with one drop of proparacaine and wait for 30 sec.
- Proptose the mouse eyes with the dulled forceps being certain to leave skin between forceps and eye.
Note: It is important to judge the pressure applied correctly. Holding the eye too firmly will cause it to become red and irritated, while too loose will allow eye to move during surgery. - Use the 30° micro-knife to make an incision in the cornea approximately 1 mm from the limbus. The incision should be 1-2 mm in length.
Note: Incision should be deep enough to penetrate beyond the epithelial layer into mid-stroma but not so deep to rupture the eye. - Use the von Graef knife to make a pocket perpendicular to the incision.
Note: Slide the knife under the corneal layer at the incision site to enlarge the space, thus forming the pocket. Be careful not to push downward with the tip to avoid rupturing the eye. - Pick up a pellet with the jeweler's forceps and place it on the eye.
Note: You can moisten the forceps with proparacaine to make it rubbery and pliable for easy implantation. - Insert the pellet into the pocket using the von Graef knife to push it inside beneath the cornea layer. Run the knife over the pocket to check that the pellet is secure.
- Coat the eye with enough antibiotic ointment.
- Turn the mouse over and repeat surgery in the opposite eye.
- Treat the mouse with vehicle as a control.
Quantification
- Leave animals to develop vessels over a set period of time. The day of vessel grading depends on growth factor used.
- Anesthetize the mouse with avertin (400-500 mg/kg).
- Stabilize the head between thumb and forefinger so skin is tightened on face and eye is slightly proptosed, positioning mouse so eye is seen in ocular with pellet directly ahead.
- Use the slit lamp microscope for grading. One ocular has a reticule, lines within the eyepiece used as a measuring aid to quantify vessel length and distance around the eye's circumference.
- Place the x-axis of the reticule along the limbus and the y-axis across the neovascularization. Measure the length of vessels branching upward toward pellets. Record this measurement in tenths of millimeters and designate vessel length (VL) (Figure 2A).
- Turn the reticule so that the distance around the eye that these vessels have sprouted becomes clear. It is easiest to think of the eye as a clock face with intervals of 1 through 12. Designate this number clock hour (CH) (Figure 2B).
Note: CH is subjective. For example, some may measure the distance around the eye to include all vessels sprouted from the limbus while others may stop measuring at the point where vessel length is half maximal. The important factor is to be consistent with how one chooses to grade. - Calculate the vessel area (VA) using the formula below.
Vessel area = Vessel length (VL) x Clock hour (CH) x 0.2 π
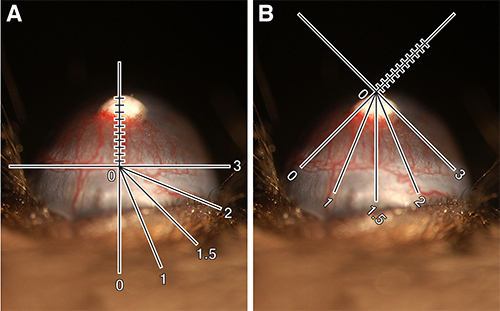 Figure 2. Quantification of corneal neovascularization.
References
- Birsner A E, et al.; The corneal micropocket assay: a model of angiogenesis in the mouse eye. Journal of Visualized Experiments, 2014, 90: 51375.
- Rogers M S, et al.; The mouse cornea micropocket angiogenesis assay. Nat Protocols, 2007, 2(10): 2545-2550.
- Poché R A, et al.; The mouse cornea as a transplantation site for live imaging of engineered tissue constructs. Cold Spring Harb Protoc, 2010.
Cell Services:
Cell Line Testing and Assays
